- Part 1: BrushNet — The Inpainting Engine
- The Problem: Teaching a Model to Fill Holes
- The Two-Branch Architecture
- What Goes Into BrushNet?
- The Key Innovation: Zero Convolutions
- Where Are Features Injected?
- Why No Cross-Attention in BrushNet?
- How Training Works
- BrushNet vs. ControlNet vs. Standard Inpainting
- Inference: Putting It All Together
- The Plug-and-Play Promise
- Model Size
- BrushNet Summary
- Part 2: BrushEdit — From “Remove the Dog” to Edited Image
- Step 1: The MLLM Understands Your Instruction
- Step 2: GroundingDINO Finds the Object
- Step 3: SAM Cuts the Exact Shape
- Step 4: BrushNet Fills the Hole
- The Full Pipeline, End to End
- Why Decompose Instead of End-to-End?
- How Does It Compare?
- BrushEdit’s Limitations
- Key Takeaways
You’ve probably seen AI tools that can erase objects from photos and fill in the gap seamlessly. But how does the model know what to put there — and how does it figure out where to edit when you just say “remove the dog”? In this post, I’ll break down two papers: BrushNet, a clever architecture that adds inpainting ability to any diffusion model, and BrushEdit, an agent pipeline that wraps BrushNet with language understanding to turn natural instructions into image edits.
Part 1: BrushNet — The Inpainting Engine
The Problem: Teaching a Model to Fill Holes
Imagine you have a photo of a dog on a beach. You want to replace the dog with a sandcastle. You need a model that:
- Understands what’s around the hole (beach, sky, waves)
- Generates something new that matches (a sandcastle)
- Blends it seamlessly at the edges
The simplest approach? Fine-tune the entire diffusion model for inpainting. But this has a big downside — you break the original model. It can’t do normal image generation anymore, and you can’t swap in a better base model later.
BrushNet’s solution: keep the original model frozen, and add a separate trainable branch alongside it.
The Two-Branch Architecture
BrushNet runs two U-Nets in parallel:
                 ┌─────────────────────────┐
  Text prompt ──→│  Base U-Net (FROZEN)     │──→ Predicted noise
                 │  Has cross-attention     │
                 │  to understand text      │
                 └────────────▲────────────┘
                              │
                         + (add features)
                              │
                 ┌────────────┴────────────┐
  Masked image ─→│  BrushNet (TRAINABLE)    │
  + mask ────────→│  NO cross-attention      │
  + noisy latent →│  Processes spatial info  │
                 └─────────────────────────┘
The Base U-Net does what it always does — denoise an image guided by a text prompt. BrushNet runs alongside it, processing the mask and surrounding context, then injects hints into the Base U-Net at every layer.
What Goes Into BrushNet?
BrushNet takes 3 things, concatenated into a 9-channel input:
┌──────────────────┐  ┌──────────────────┐  ┌──────────────────┐
│  Noisy latent    │  │  Masked image    │  │  Binary mask     │
│  (4 channels)    │  │  (4 channels)    │  │  (1 channel)     │
│                  │  │                  │  │                  │
│  Current state   │  │  What's around   │  │  Where the       │
│  of denoising    │  │  the hole        │  │  hole is         │
└──────────────────┘  └──────────────────┘  └──────────────────┘
         │                     │                     │
         └─────────────────────┴─────────────────────┘
                               │
                     Concatenate → 9 channels
                               │
                         ┌─────▼─────┐
                         │ BrushNet  │
                         └───────────┘
Why these 3 inputs? What does each one do?
Each input answers a different question:
1. Noisy latent z_t (4 channels) — “What step are we at?”
This is the current state of the image being denoised. At each timestep during the denoising loop, the image goes from pure noise to clean image. BrushNet needs to see this so it knows how much noise is left and can produce appropriate injection features for the current step.
t=T (start):   z_t = pure noise          → BrushNet: "everything is noisy, give strong guidance"
t=T/2 (mid):   z_t = half noise/half image → BrushNet: "refine the details"
t=0 (end):     z_t = nearly clean         → BrushNet: "just fix edges"
2. Masked image latent z_masked (4 channels) — “What’s around the hole?”
This is the original image with the masked region zeroed out, then VAE-encoded. It tells BrushNet what the surrounding context looks like — colors, textures, edges near the mask boundary.
Original:     [beach][dog][beach]
Mask applied: [beach][ 0 ][beach]    ← dog region zeroed out
VAE encode:   [4-channel latent]     ← this goes to BrushNet
Why 4 channels instead of 3 (RGB)? Because the U-Net operates in VAE latent space, not pixel space. Raw pixels would be mismatched — like feeding English text into a Chinese language model. The VAE encoder translates the image into the same “language” the U-Net understands.
Original image (512×512×3)
        │
   Apply mask (zero out hole region)
        │
   VAE Encoder
        │
Masked image latent (64×64×4)   ← This goes to BrushNet
3. Mask (1 channel) — “Where is the hole?”
A simple binary map: 1 = inpaint here, 0 = keep original. You might think BrushNet could figure this out from the masked image alone (just look for the zeros), but zeroed-out pixels are ambiguous:
Without mask channel:
  z_masked has zeros at (2,3) → Is this black pixels or a hole? 🤷

With mask channel:
  z_masked has zeros at (2,3) + mask=1 at (2,3) → Definitely a hole! ✓
Why all 3 are necessary
| Without… | Problem |
|---|---|
| Noisy latent | BrushNet doesn’t know which denoising step → wrong features |
| Masked image | BrushNet can’t see surrounding context → can’t blend |
| Mask | BrushNet can’t distinguish “black pixel” from “hole” |
Each input answers a different question: when (timestep), what’s around (context), and where (hole location).
The Key Innovation: Zero Convolutions
Here’s the clever part. BrushNet’s features are injected into the Base U-Net through zero convolutions — 1×1 convolutions where all weights start at zero.
At training start:

BrushNet feature ──→ ZeroConv ──→ 0.0 ──→ + Base U-Net feature
                     (all zeros)           (unchanged!)
Why? Because the Base U-Net is a carefully trained model. If you inject random noise into it on day one, you’d destroy its ability to generate images. Starting from zero means:
Training step 0:     BrushNet contributes nothing     (U-Net works normally)
Training step 100:   BrushNet whispers tiny hints      (weights: 0.001)
Training step 10K:   BrushNet provides real guidance   (weights: 0.1)
Concrete Example
Say BrushNet produces a feature value of 0.8 at some position. Here’s what the zero convolution does with it over training:
Step 0:     weight = 0.0    →  0.0 × 0.8 = 0.0    (silent)
Step 1000:  weight = 0.02   →  0.02 × 0.8 = 0.016  (whispering)
Step 10000: weight = 0.25   →  0.25 × 0.8 = 0.2    (contributing)
It’s like slowly turning up the volume from mute. The Base U-Net is never shocked by sudden changes.
Where Are Features Injected?
Unlike ControlNet (which only injects into the decoder), BrushNet injects at every single layer — all encoder blocks, the mid block, and all decoder blocks:
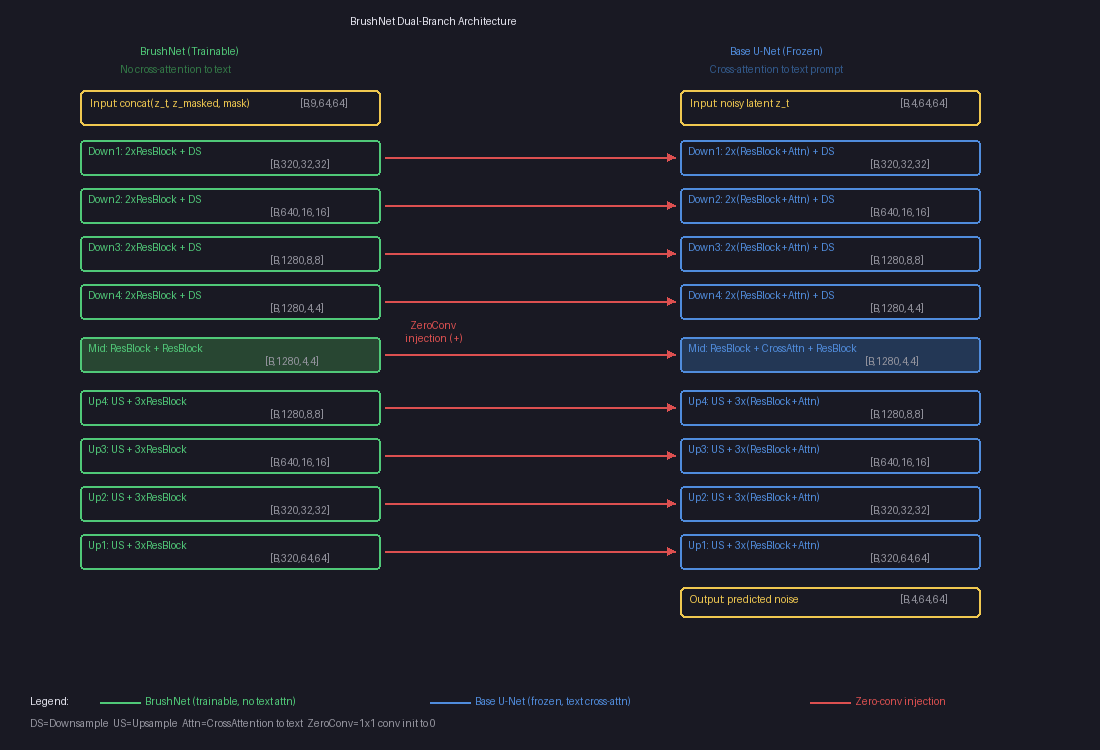
The left column (green) is the trainable BrushNet branch — no cross-attention to text. The right column (blue) is the frozen Base U-Net with text cross-attention. The red arrows are zero-conv injection points where BrushNet features are added element-wise to the Base U-Net.
Each arrow is actually multiple injection points (one per sub-layer), totaling about 25 injection points in total. This dense injection gives BrushNet pixel-level control, which is crucial for inpainting — you need precise boundaries where the generated content meets the original image.
Why No Cross-Attention in BrushNet?
The Base U-Net has cross-attention layers that let it understand text prompts:
Base U-Net block:    ResBlock → CrossAttention("a sunflower") → output
BrushNet block:      ResBlock →                                output
                                   ↑
                             (removed!)
This is by design. BrushNet’s job is purely spatial — “here’s a hole, here’s what’s around it.” The text understanding stays in the Base U-Net. This separation means:
- BrushNet is smaller (~480M vs ~520M params) because it skips attention layers
- It focuses entirely on where to inpaint, not what to generate
- What to generate is handled by the Base U-Net via the text prompt
How Training Works
The training loop is surprisingly simple — it uses the standard diffusion denoising loss:
For each training step:

1. Take a clean image                    "cat on a couch"
2. Generate a RANDOM mask                (random shape, random position)
3. Apply mask to image                   (hole in it)
4. VAE-encode both                       z₀ (clean latent), z_masked (masked latent)
5. Add random noise to clean latent      z_t = mix(z₀, noise, t)
6. Run through both branches:
     BrushNet(z_t, z_masked, mask)       → injection features
     Base_UNet(z_t, text) + features     → predicted noise
7. Loss = ‖ predicted_noise - actual_noise ‖²       (MSE)
Wait — the loss compares noise, not images?
Yes! The model predicts what noise was added, not what the clean image looks like. We know the actual noise because we added it ourselves in step 5. If the model can perfectly predict the noise, we can subtract it to recover the clean image.
We added noise ε to get z_t.
Model predicts ε_θ.
If ε_θ ≈ ε, then z₀ ≈ (z_t - ε_θ) / scale   ← clean image recovered!
No special mask-weighted loss?
Nope. The loss is computed over the entire image, not just the masked region. But the model naturally focuses on the mask because:
- Outside the mask: the frozen Base U-Net already handles this well. BrushNet’s zero-convs learn to stay quiet here (contributing nothing reduces loss just fine).
- Inside the mask: the Base U-Net struggles without context. BrushNet’s features are the only thing that helps here, so gradients push the zero-convs to output useful values.
The mask guides learning implicitly through gradients, not explicitly through loss weighting.
Training data: just clean images
BrushNet doesn’t need paired before/after examples. It’s self-supervised:
Dataset: clean images + text descriptions (same data as Stable Diffusion)
Masks:   generated randomly during training
The model learns to reconstruct whatever was behind a random mask, using the surrounding context and text prompt. At inference, you provide a real mask of what you want to replace.
BrushNet vs. ControlNet vs. Standard Inpainting
| Feature | SD Inpainting | ControlNet | BrushNet |
|---|---|---|---|
| Base model | Modified (retrained) | Frozen | Frozen |
| Branch coverage | N/A (single model) | Encoder only | Full U-Net |
| Injection points | N/A | ~12 (decoder only) | ~25 (everywhere) |
| Swap base models? | No | Yes | Yes |
| Extra params | 0 | ~360M | ~480M |
| Text handling | Single model | Branch has cross-attn | Branch has NO cross-attn |
| Best for | General inpainting | Structural control | Precise inpainting |
Why full U-Net matters for inpainting
ControlNet copies only the encoder half — it injects features into the decoder via the skip connections. This works well for structural guidance (edges, poses) but not for inpainting, where you need fine-grained control at every spatial resolution.
The BrushNet paper showed this clearly:
Full U-Net (BrushNet):  PSNR 19.86  ← best quality
Half U-Net:             PSNR 19.01
ControlNet-style:       PSNR 18.28  ← worst quality
Inpainting needs dense per-pixel control, especially at mask boundaries where generated content must blend seamlessly with the original image.
Inference: Putting It All Together
At inference time, the full pipeline looks like this:
1. User provides: image + mask + text prompt ("a sunflower")

2. Encode:
   masked_image = apply_mask(image, mask)
   z_masked = VAE_encode(masked_image)         [4, 64, 64]
   mask_small = downsample(mask)                [1, 64, 64]

3. Start from pure noise:
   z_T ~ N(0, I)                                [4, 64, 64]

4. Denoise loop (T steps, e.g. 25-50):
   for t in T → 0:
       brushnet_feats = BrushNet(z_t, z_masked, mask_small, t)
       noise_pred = BaseUNet(z_t, t, "a sunflower") + brushnet_feats
       z_{t-1} = scheduler_step(z_t, noise_pred)

5. Decode final latent:
   result = VAE_decode(z_0)                     [3, 512, 512]

6. Blend:
   output = blur_blend(result, original_image, mask)
The final blending step uses a Gaussian-blurred mask to smooth the transition between generated and original pixels, avoiding hard edges.
The Plug-and-Play Promise
Because the Base U-Net is never modified, you can:
- Train one BrushNet and use it with any compatible base model
- Swap in a photorealistic model, an anime model, or a custom fine-tune
- The base model keeps all its original capabilities (text-to-image still works)
- Adjust the
conditioning_scale(0.0 to 1.0) to control how much BrushNet influences the output
scale = 0.0  →  Base U-Net only (no inpainting guidance)
scale = 0.5  →  Gentle inpainting hints
scale = 1.0  →  Full BrushNet influence (default)
Model Size
Base U-Net (frozen):     ~520M params
BrushNet (trainable):    ~480M params
  └─ Zero-conv layers:    25 layers, ~20M params
Total at inference:      ~1,000M params (1B)
BrushNet is nearly the same size as the Base U-Net — the only difference is removing cross-attention layers (~40M params saved). The trade-off is clear: 2x memory for plug-and-play flexibility.
BrushNet Summary
BrushNet gives us a powerful inpainting engine. But using it requires you to provide two things manually: a mask (where to edit) and a text prompt (what to generate). For simple cases that’s fine — draw a circle around the dog, type “a sunflower.”
But what if you just want to say “remove the dog” and have the system figure out the rest?
That’s exactly what BrushEdit does. It wraps BrushNet in an intelligent agent pipeline that automates the mask and prompt generation.
Part 2: BrushEdit — From “Remove the Dog” to Edited Image
BrushEdit (arXiv 2412.10316) doesn’t change BrushNet’s architecture at all. Instead, it asks: how do you go from a natural language instruction to a BrushNet-ready mask and prompt?
The answer is an assembly line of 4 AI models:
User: "Remove the dog from the garden"
                │
                ▼
  ┌───────────────────────────┐
  │ 1. MLLM (Qwen2-VL)       │  "What kind of edit? What object?"
  │    Classify + Identify    │  → edit_type = "remove"
  │    + Generate caption     │  → target = "dog"
  └────────────┬──────────────┘  → caption = "garden with flowers"
               ▼
  ┌───────────────────────────┐
  │ 2. GroundingDINO          │  "Where is the dog?"
  │    Text → bounding box    │  → bbox around the dog
  └────────────┬──────────────┘
               ▼
  ┌───────────────────────────┐
  │ 3. SAM                    │  "What's the exact shape?"
  │    Bbox → pixel mask      │  → silhouette of the dog
  └────────────┬──────────────┘
               ▼
  ┌───────────────────────────┐
  │ 4. BrushNet + SD 1.5      │  "Fill the hole"
  │    Mask + caption → image │  → dog replaced with garden
  └───────────────────────────┘
Each model does one thing well. Let’s walk through each step.
Step 1: The MLLM Understands Your Instruction
The MLLM (a vision-language model like Qwen2-VL or GPT-4o) is called three separate times, each with a different question. No fine-tuning — it’s used purely through prompt engineering.
Call 1: “What kind of edit?”
System: "Classify this editing instruction into one of:
         addition, remove, local, global, background.
         Reply with a single word."
User:   "Remove the dog from the garden"

→ "remove"
This classification matters because each edit type needs a different mask strategy:
| Edit Type | What Happens to the Mask |
|---|---|
| Remove “Remove the dog” | Detect dog → segment it → dilate mask edges |
| Addition “Add a cat on the sofa” | No detection needed — MLLM predicts a bounding box |
| Local “Make the car blue” | Detect car → segment it → use mask as-is |
| Background “Change to a beach” | Detect foreground → segment → invert the mask |
| Global “Make it nighttime” | Mask the entire image |
Call 2: “What object?”
System: "Identify the main object being edited.
         Reply with no more than 5 words, a single noun phrase."
User:   "Remove the dog from the garden"

→ "dog"
This short phrase will be fed to GroundingDINO as a search query. It needs to be concise — just enough to find the right thing in the image.
Call 3: “What should the result look like?”
System: "Describe what the image should look like AFTER the edit.
         Do NOT include elements that are removed or changed."
User:   [source image] + "Remove the dog from the garden"

→ "A peaceful garden path with green grass and flowers"
This becomes the text prompt for BrushNet’s inpainting. Notice: it describes the scene without the dog — because we’re removing it. The MLLM has to understand the instruction well enough to describe the result, not just parrot the input.
Why training-free works here
All three calls use the MLLM off-the-shelf. No fine-tuning. This means you can swap backends freely:
GPT-4o  →  Best quality, requires API key, costs money
Qwen2-VL →  Best open-source, runs locally, ~16 GB VRAM
LLaVA   →  Lighter alternative, ~17 GB VRAM
The paper doesn’t fine-tune any of these models. It just writes good prompts. This is a deliberate design choice — it keeps the system modular and easy to upgrade as better VLMs come out.
Step 2: GroundingDINO Finds the Object
Now we know we’re looking for “dog.” But where in the image is it?
GroundingDINO is an open-vocabulary object detector. Unlike traditional detectors that only recognize a fixed set of classes (like COCO’s 80 categories), it takes any text query and finds matching objects:
Input:  image + "dog"
Output: bounding box (128, 128, 384, 384), confidence 0.89
┌────────────────────────┐
│                        │
│    ┌──────────┐        │
│    │          │        │
│    │   dog    │        │
│    │          │        │
│    └──────────┘        │
│         ↑              │
│    bounding box        │
│    from DINO           │
└────────────────────────┘
This works for any object you can describe in words. “Red car,” “wooden table,” “person in blue shirt” — GroundingDINO handles them all.
Exception: addition edits. If the instruction is “add a cat on the sofa,” there’s no cat to detect yet. In this case, GroundingDINO is skipped entirely. Instead, the MLLM predicts where the new object should go by outputting a bounding box: “given this 512×512 image, the cat should go at [256, 170, 128, 170].”
Step 3: SAM Cuts the Exact Shape
A bounding box is too rough. The box around the dog also includes chunks of grass, maybe a bit of fence. We need the exact silhouette.
SAM (Segment Anything Model) takes the bounding box and produces a pixel-precise mask:
Before (bounding box):          After (SAM mask):

┌────────────────────────┐      ┌────────────────────────┐
│                        │      │                        │
│    ┌──────────┐        │      │      ████████          │
│    │ grass    │        │      │    ████████████        │
│    │   dog    │        │      │    ██████████          │
│    │ grass    │        │      │      ██████            │
│    └──────────┘        │      │        ██              │
│                        │      │                        │
└────────────────────────┘      └────────────────────────┘

Box includes background         Mask follows the dog's
around the dog                   exact silhouette
Edit-type-specific mask adjustments
After SAM produces the mask, BrushEdit adjusts it based on the edit type:
- Remove: Dilate the mask by a few pixels. Fur, hair, and shadows often extend slightly beyond the segmentation boundary. Expanding the mask catches these fuzzy edges.
- Background: Invert the mask. Instead of masking the dog, mask everything except the dog. Now BrushNet will regenerate the entire background while keeping the dog untouched.
- Local: Use the mask as-is. The object is being modified, so we need to cover exactly that region.
Remove (dilated):            Background (inverted):

┌────────────────────────┐   ┌────────────────────────┐
│                        │   │████████████████████████│
│     ██████████         │   │████            ████████│
│   ██████████████       │   │██                ██████│
│   ████████████         │   │████            ████████│
│     ████████           │   │██████        ██████████│
│       ████             │   │████████████████████████│
│                        │   │████████████████████████│
└────────────────────────┘   └────────────────────────┘
Expanded to catch fur/shadow  Everything EXCEPT the dog
Step 4: BrushNet Fills the Hole
Now we have everything BrushNet needs:
| Input | Value |
|---|---|
| Mask | Pixel-precise segmentation from SAM (dilated for removal) |
| Caption | “A peaceful garden path with green grass and flowers” |
| Original image | The source photo |
This is the exact same BrushNet pipeline we covered in Part 1:
1. masked_image = original × (1 - mask)          ← zero out the dog region
2. z_masked = VAE.encode(masked_image)            ← encode to latent space
3. conditioning = concat(z_masked, mask)          ← 5-channel conditioning
4. Denoising loop (50 steps):
     BrushNet features = BrushNet(z_t, conditioning)
     noise_pred = Base_UNet(z_t, "garden with flowers") + BrushNet features
     z_{t-1} = scheduler.step(z_t, noise_pred)
5. result = VAE.decode(z_0)                       ← back to pixel space
6. output = blur(mask) × result + (1-blur(mask)) × original  ← blend
The blurred mask blending at the end creates a smooth transition at the boundary. Without it, you’d see a hard edge where the generated content meets the original image. This single step accounts for a +10 PSNR improvement in ablation studies.
The Full Pipeline, End to End
Let’s trace through one more example to make sure it’s clear. Instruction: “Change the background to a tropical beach.”
Step 1: MLLM classifies → "background"
        MLLM identifies  → "person" (the foreground object to keep)
        MLLM captions    → "A person standing on a tropical beach with
                            palm trees and turquoise water"

Step 2: GroundingDINO("person") → bounding box around the person

Step 3: SAM(bbox) → pixel mask of the person
        Mask is INVERTED → now covers everything EXCEPT the person
        Coverage: ~75% of the image

Step 4: BrushNet inpaints the masked region (the background)
        using caption "tropical beach with palm trees"
        Person is preserved in the unmasked region
        Blended at edges for seamless transition
The key insight for background edits: GroundingDINO detects the foreground object (the person), SAM segments it, then the mask is inverted. BrushNet never touches the person — it only regenerates the background.
Why Decompose Instead of End-to-End?
You might wonder: why not train one big model that takes “remove the dog” and directly outputs an edited image? That’s what InstructPix2Pix does. BrushEdit’s decomposed approach has three advantages:
1. Transparency. Every intermediate result is visible. You can see the edit classification (“remove”), the detected object (“dog”), the mask, and the caption. If something goes wrong, you know exactly where.
2. User control. You can override any step. Don’t like the auto-generated mask? Draw your own. Want a different caption? Type one. The pipeline doesn’t force you into a black box.
3. No paired training data. InstructPix2Pix needs millions of (instruction, before, after) triples — expensive to create. BrushEdit needs none. The MLLM is used off-the-shelf, GroundingDINO and SAM are pre-trained, and BrushNet trains on standard images with random masks.
The trade-off is complexity. BrushEdit orchestrates 4 separate models totaling ~66 GB of weights. But each model is best-in-class at its job, and you can upgrade any component independently.
How Does It Compare?
vs. Inversion-based methods (DDIM+P2P, Null-Text)
These methods invert the image to noise, then re-denoise with edits. BrushEdit skips inversion entirely — it generates directly in the masked region.
| Method | PSNR (quality) | Time |
|---|---|---|
| DDIM + P2P | 22.67 | 11s |
| Null-Text + P2P | 26.52 | 148s |
| BrushEdit | 32.16 | 3.6s |
5 PSNR better and 3-40x faster.
vs. Original BrushNet
BrushEdit uses BrushNet internally, but improves on it:
| BrushNet | BrushEdit | |
|---|---|---|
| Mask generation | Manual | Automatic (MLLM + DINO + SAM) |
| Caption | Manual | Automatic (MLLM) |
| Model checkpoints | 2 separate (seg masks, random masks) | 1 unified model |
| Object removal | Limited | Trained explicitly with removal data |
| Multi-round editing | No | Yes (output becomes next input) |
The unified model comes from training on BrushData-v2 — a merged dataset that combines segmentation masks and random masks, plus new removal training pairs where clean-background images are paired with random masks.
BrushEdit’s Limitations
No system is perfect. BrushEdit struggles with:
Irregular masks. Very thin, fragmented, or oddly shaped masks can produce artifacts. The model was trained mostly on blob-like masks and object silhouettes.
Text-mask misalignment. If the caption says “a large elephant” but the mask is tiny, the model can’t fit an elephant in there. The MLLM doesn’t always reason well about spatial constraints.
Base model ceiling. BrushEdit uses Stable Diffusion 1.5 as its backbone. Output quality is bounded by what SD 1.5 can generate. It can’t produce FLUX-quality images because the underlying diffusion model isn’t that capable.
VLM errors cascade. If the MLLM misclassifies the edit type (calling a “remove” a “local edit”), the entire downstream pipeline produces wrong results. There’s no error recovery between steps.
Key Takeaways
BrushNet (Part 1):
- Dual-branch design: Frozen base model + trainable BrushNet branch. Plug-and-play.
- 9-channel input: Noisy latent (4) + masked image latent (4) + mask (1).
- Zero convolutions: Start silent, gradually learn. Stable training.
- Full U-Net coverage: Encoder + mid + decoder injection. Not just the encoder (ControlNet-style).
- No cross-attention in BrushNet: Text stays in the Base U-Net. BrushNet handles spatial information only.
BrushEdit (Part 2):
- 4-model assembly line: MLLM → GroundingDINO → SAM → BrushNet. Each model does one job well.
- Training-free VLM: The MLLM is used off-the-shelf through prompt engineering. No fine-tuning. Swap backends freely.
- Edit-type-aware masks: Different edit types get different mask treatments (dilated for removal, inverted for background, bbox for addition).
- Transparent pipeline: Every intermediate result is visible and overridable by the user.
- Unified inpainting model: One BrushNet checkpoint handles all mask types, trained on BrushData-v2.
The two papers together tell a clean story: BrushNet solves how to inpaint (the architecture), and BrushEdit solves what to inpaint (the intelligence layer that turns natural language into masks and captions).
This post covers BrushNet (ECCV 2024) and BrushEdit (arXiv 2412.10316). The architecture diagrams come from hands-on experimentation and code analysis of the TencentARC/BrushEdit repository.